In summary:
- To get crowd-free landmark photos, don’t just visit at odd hours. Master technical skills to actively control the scene.
- Use « look up » angles and telephoto lenses to manipulate perspective and isolate your subject from its chaotic surroundings.
- Leverage advanced techniques like Median Stacking in Photoshop for hyper-realistic crowd removal that surpasses simple long exposure.
- Shoot during the « blue hour » when the balance between artificial and ambient light provides a technical advantage for cleaner, more dramatic shots.
- Understand that your best tools are patience, planning, and a deep understanding of how your camera sees the world.
There’s a universal frustration that every amateur photographer knows intimately: you travel thousands of miles to see a magnificent historical landmark, you frame the perfect composition, and then… a sea of tourists in brightly colored jackets floods your shot. The common advice is to « go early, » « use a long exposure, » or « just clone them out. » But these are platitudes, surface-level fixes that often lead to generic, uninspired images. They treat the crowd as an obstacle to be avoided, not a variable to be controlled.
The truth that seasoned travel photographers understand is that capturing a pristine image of a busy landmark isn’t about luck or simply avoiding people. It’s about a fundamental shift in approach: from passive avoidance to active technical control. The real key isn’t just managing your time, but mastering your tools and techniques to deliberately manipulate perspective, light, and even time itself. What if the secret wasn’t just finding an empty space, but creating one through the specific application of photographic principles?
This guide moves beyond the basics. We will break down the technical strategies that allow you to dictate what appears in your frame, regardless of the crowds. We will explore how to use camera angles to erase the ground, how lens choice fundamentally changes the relationship between subject and background, and which post-processing methods deliver truly professional results. By the end, you’ll see the crowd not as a problem, but as a parameter you can technically manage.
To navigate this technical journey, this article is structured to build your skills progressively. From immediate in-camera techniques to advanced post-processing and logistical planning, each section provides a new layer of control for your landmark photography.
Summary: A Technical Guide to Crowd-Free Landmark Photography
- How to Use « Look Up » Angles to Eliminate Crowds From Your Frame?
- Wide Angle vs Telephoto: Which Lens Compresses Backgrounds Better?
- Photoshop Generative Fill vs Long Exposure: Which Removes People Better?
- The « Blue Hour » Advantage: Why It Beats Golden Hour for City Landmarks
- When to Apply for a Tripod Permit at Major Heritage Sites?
- Visiting Cultural Heritage Centers: How to Make History Interesting for Teenagers?
- Tokyo Tech Adventures: How to Navigate Akihabara’s Retro Scene Without Knowing Japanese?
- Visiting Cultural Heritage Centers: How to Make History Interesting for Teenagers?
How to Use « Look Up » Angles to Eliminate Crowds From Your Frame?
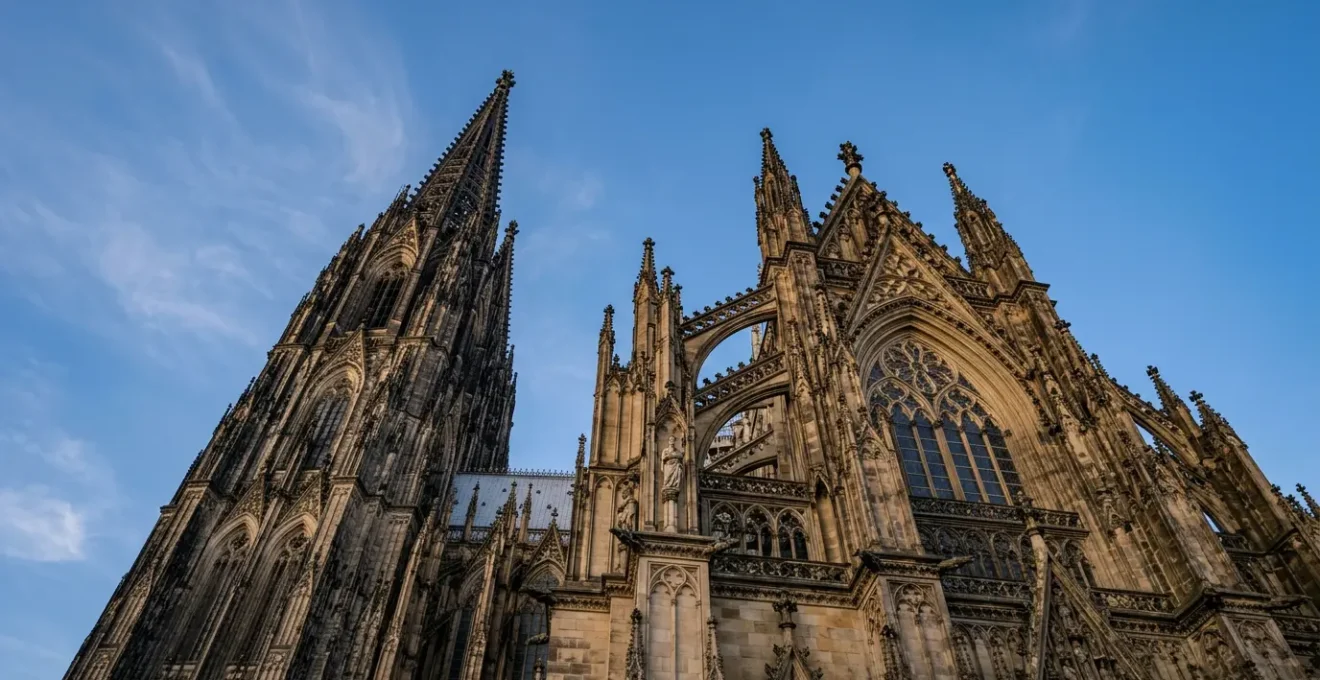
The most immediate and powerful tool for eliminating crowds is to change your physical relationship with the subject. Tourists congregate on the ground. By forcing your camera’s perspective upward, you can literally crop them out of existence before you even press the shutter. This isn’t just about pointing your camera up; it’s about deliberate perspective manipulation to tell a story of grandeur and scale, using the architecture itself to block the chaos below.
A low-angle shot, with the camera positioned below your eye level, makes any structure appear more imposing and heroic. It naturally fills the upper portion of your frame with the building and the sky, leaving no room for the ground-level activity. This technique is most effective when you get extremely close to the base of the landmark. Look for leading lines in the architecture—the edge of a column, a window frame, or a buttress—and use them to guide the viewer’s eye upward, away from the unseen crowd.
While this method is effective, it can introduce perspective distortion, where vertical lines appear to converge dramatically (known as keystoning). Many photographers see this not as a flaw, but as a creative tool to enhance the sense of height and power. However, if a more realistic representation is desired, this distortion can be easily corrected in post-production with tools like Lightroom’s ‘Upright’ feature. The goal is to make a conscious choice: embrace the distortion for dramatic effect or correct it for architectural accuracy.
Case Study: Reflection Photography to Invert the Scene
A clever variation of the « look up » angle is to, paradoxically, look down. After a rain shower, photographers can use puddles as natural mirrors. By angling the camera downward to capture the reflection of a landmark’s upper spires or facade in the water, you create an inverted composition. This technique effectively isolates the most interesting architectural details while the real-world crowds remain completely outside the reflected frame, offering a serene, abstract take on a busy location.
Wide Angle vs Telephoto: Which Lens Compresses Backgrounds Better?
Your choice of lens is your primary tool for controlling the relationship between your subject and its environment. When dealing with crowds, the debate between wide-angle and telephoto lenses isn’t just about field of view; it’s a strategic choice about isolation and compression. Understanding how each lens type manipulates perspective is crucial for extracting a clean shot from a chaotic scene.
A common misconception is that telephoto lenses « compress » the background. Technically, compression is a function of distance, not the lens itself. Because a telephoto lens requires you to stand far from your subject, it makes distant background elements appear closer and larger relative to the subject. This effect is your greatest ally. By standing far away and using a long focal length (200mm or more), you can « snipe » a specific, iconic detail—a clock face, a statue on a ledge, a single archway—and the distance itself acts as a natural barrier, placing you far from the crowds at the base of the landmark.
Conversely, a wide-angle lens (14-35mm) does the opposite. It exaggerates the distance between foreground and background, making your subject feel deeply embedded in its environment. While this is great for capturing grand, sweeping vistas, it also means you capture all the clutter and people within that environment. A wide-angle lens forces you to deal with the crowd by relying on other techniques, like waiting for a lull or shooting during the blue hour when the environment is more likely to be empty.
This table breaks down the strategic choice. There isn’t a « better » lens, only a « better » tool for a specific strategy: immersive context with a wide-angle, or surgical isolation with a telephoto. Mastering both allows you to adapt to any situation. An analysis published on the principles of lens compression confirms that the effect is created by the change in distance-to-subject, which a telephoto lens necessitates.
| Criterion | Wide-Angle Lens (14-35mm) | Telephoto Lens (200-400mm) |
|---|---|---|
| Compression Effect | None; exaggerates distance between foreground and background, making background elements appear smaller and farther away | Strong; appears to ‘pull’ background closer to subject due to shooting distance, not lens itself |
| Subject Isolation | Weak; immerses landmark in its (potentially crowded) environment | Excellent; extracts landmark from context, making distance your greatest tool against crowds |
| Crowd Avoidance Strategy | Shoot during blue hour for empty environmental context; use negative space | Telephoto ‘Sniping’: isolate single iconic detail (clock face, statue) from great distance, physically impossible to shoot from crowded areas |
| Depth of Field | Deep (f/8-f/11); keeps entire scene in focus, including crowds | Shallow (f/2.8-f/5.6); blurs foreground crowds, emphasizes isolated landmark detail |
| Optimal Use Case | Grand, empty environmental shot at dawn/blue hour showing landmark in context | Detail extraction during peak daylight, bypassing crowds by shooting from afar |
Photoshop Generative Fill vs Long Exposure: Which Removes People Better?
Once you’ve exhausted in-camera options, the digital darkroom offers powerful solutions. For years, the go-to technique was a long exposure, using an ND filter to blur moving people into non-existence. Today, AI-powered tools like Photoshop’s Generative Fill offer a seemingly instant fix. However, the best technique for professionals is often a third, less-known method: Median Stacking. The choice between them is a trade-off between speed, realism, and ethical authenticity.
A long exposure (10-30 seconds) doesn’t truly remove people; it renders them as ethereal blurs or ghosts. This has an artistic appeal and is an honest documentation of the scene’s energy. However, if a person stops moving even for a few seconds, they will appear as a semi-transparent ghost, and the effect can look messy. Generative Fill, on the other hand, fabricates reality. It analyzes the surrounding pixels and generates new content to fill the space where a person was. While impressively fast, it can produce subtle but noticeable AI artifacts—unnatural textures, repeating patterns, and a slight « painterly » look that may not match the photographic quality of the rest of the image.
Median Stacking offers the highest level of realism. This technique involves taking 15-20 photos from a tripod over several minutes. In Photoshop, a script analyzes this « stack » of images pixel by pixel and calculates the median color value. Since moving objects like people are in different places in each frame, they are statistically identified as outliers and filtered out, leaving only the static elements (the building) that appear in every shot. The result is a hyper-realistic, perfectly clean image that is indistinguishable from a scene that was genuinely empty.
The following matrix, informed by pro community discussions and resources like the Photoshop Training Channel, breaks down the decision-making process for a photographer.
| Method | Realism | Time on Site | Post-Processing Skill | Ethical Authenticity | Potential Artifacts |
|---|---|---|---|---|---|
| Long Exposure (10-30s) | Medium; creates motion blur, documenting crowd presence | Low; single shot, 30s-2min | Beginner; in-camera technique, minimal editing | High; documents reality (crowd as blur), honest representation | Motion blur trails, ghosting if people stop moving |
| Median Stacking (Photoshop) | Highest; hyper-realistic, perfectly clean, indistinguishable from reality | Medium; 15-20 shots over 5-10 minutes, tripod required | Intermediate; requires Photoshop Scripts > Statistics > Median mode | Medium; denies crowd existence, creates ‘solitary fantasy’ | Minimal; occasional alignment issues if handheld, static people remain |
| Generative Fill (AI) | High; convincing but may show AI texture patterns upon close inspection | Low; single shot sufficient | Intermediate-Advanced; prompt crafting, layering fills, clone stamp refinement | Low; AI fabrication, denies crowd existence | Medium; texture inconsistencies, unnatural repetition, prompt-dependent quality |
Your Action Plan: Median Stacking Professional Workflow
- Set up a stable tripod and lock all settings (aperture, ISO, focal length). Take 15-20 shots over 5-10 minutes, waiting 30 seconds between frames to allow people to move through different areas.
- In Photoshop, go to File > Scripts > Statistics. Select ‘Folder’ as source and browse to your image sequence.
- Choose ‘Median’ as the Stack Mode and check ‘Attempt to Automatically Align Source Images’ to compensate for minor camera movement.
- Photoshop processes the stack, calculating the median RGB value for each pixel. Moving elements (people, vehicles) are statistically filtered out, leaving only permanent structures.
- Review the result. The median algorithm removes all objects that don’t appear in the majority of frames, creating a hyper-realistic, crowd-free image.
The « Blue Hour » Advantage: Why It Beats Golden Hour for City Landmarks
While « golden hour » gets all the praise for its warm, soft light, for the technical photographer aiming to shoot city landmarks, the « blue hour » is often superior. This fleeting period just before sunrise and after sunset offers a strategic advantage that is less about aesthetics and more about the physics of light. The core advantage is achieving a natural light balance between the darkening ambient sky and the landmark’s own artificial lighting.
During the golden hour, the sun is still a powerful light source. If a landmark is artificially lit, you’ll face a massive dynamic range problem: either the sky will be properly exposed and the building’s lights will be blown-out white blobs, or the lights will be correct and the sky will be a dark, underexposed mess. The blue hour solves this. It occurs when the sun is between -4° and -6° below the horizon, a window that can last from 20 to 40 minutes. In this period, the brightness of the deep blue twilight sky perfectly matches the brightness of the artificial lights on the building. This allows you to capture the entire scene in a single, perfectly balanced exposure.
This balance creates a beautiful warm-cool color contrast that makes the illuminated architecture pop against the rich, deep blue of the sky. Furthermore, far fewer tourists are around during these times. The blue hour rewards the prepared photographer. Using an app like PhotoPills to plan the exact timing for your location is essential. According to their comprehensive guide to natural light, the key window for this perfect balance happens when the sun elevation is between -4° and -6° below the horizon. Arrive early, set up your composition during the golden hour, and be ready to shoot as the sky transitions into that perfect, deep blue.
Even bad weather can be an advantage. Fog or mist during the blue hour will diffuse the city lights, creating a soft, cinematic glow. Post-rain wet pavement will create stunning reflections, doubling the impact of the landmark’s lights and adding a layer of texture and depth that a simple daytime shot could never achieve. This is where planning and patience turn a potential obstacle into a unique opportunity.
When to Apply for a Tripod Permit at Major Heritage Sites?
Nothing attracts unwanted attention from security faster than setting up a large tripod in a busy area. The rules surrounding tripod use are often ambiguous and inconsistently enforced, leaving many photographers confused. The decision to apply for a permit, or whether one is even needed, depends on a risk assessment based on four key factors: location, equipment, activity, and crowd density.
In general, wide-open public squares and plazas (like Piazza San Marco in Venice or Trafalgar Square in London) are low-risk areas where tripod use for personal photography is often tolerated, especially during off-peak hours. The risk escalates dramatically when you move indoors to museums, palaces, or enclosed monuments, where tripods are almost universally banned without a commercial permit. The scale of your equipment also matters. A small, flexible Gorillapod or a tabletop tripod is far less likely to cause issues than a full-size, professional tripod with its center column extended. The more « professional » your setup looks, the more likely you are to be questioned.
Your perceived intent is another major factor. Security personnel are trained to differentiate between a casual tourist taking a snapshot and what looks like a commercial shoot. If you spend a long time setting up, use multiple lenses, and have assistants or light reflectors, you will almost certainly be stopped and asked for a permit, regardless of your actual intent. Finally, crowd density is a practical concern. During peak hours, a tripod can become a tripping hazard and is more likely to be seen as « impeding public access »—a common justification for asking photographers to pack up.
To avoid issues, your best strategy is stealth and preparation. Before your visit, perform a « permit research protocol »: search online for « [Landmark Name] photography policy » or « filming regulations. » If the rules are unclear, contact the site’s administration office at least two weeks in advance. In the field, consider tripod alternatives like Platypods (low-profile camera plates), clamps, or high-quality beanbags. Furthermore, modern In-Body Image Stabilization (IBIS) can allow for handheld shots of several seconds, making a tripod unnecessary in many low-light situations and neatly bypassing the entire permit issue. The key is to operate discreetly, minimize your setup time, and have a backup plan.
Visiting Cultural Heritage Centers: How to Make History Interesting for Teenagers?
For a photographer parent, a visit to a cultural heritage site with a teenager can feel like a battle between a desire for quiet contemplation and the reality of a short attention span. The secret to bridging this gap is to transform the visit from a passive history lesson into an active, creative mission. Your camera is the perfect tool for this. By framing the visit as a photographic treasure hunt, you can make history engaging and tangible.
Instead of a meandering tour, create a specific shot list or a set of creative challenges. This gives the teenager a clear objective and a reason to look closely at their surroundings. The challenges can be tailored to the specific location and the teen’s interests. For example:
- The Detail Hunter: Challenge them to find and photograph five « hidden » faces carved in stone, or three different types of window arches.
- The Texture Challenge: Ask them to capture five completely different textures—worn stone, rough wood, smooth marble, peeling paint, rusted iron. This forces them to observe the materials and aging of the site.
- The Story in Three Photos: Task them with telling the story of a specific room or courtyard in just three images—one wide shot (establishing the scene), one medium shot (the main subject), and one close-up (a crucial detail).
This approach shifts the dynamic from « look at that old thing » to « how can I capture this in a cool way? » It encourages them to think about composition, lighting, and narrative. You’re not just showing them history; you’re giving them the tools to interpret it and create something of their own. Providing them with a simple point-and-shoot camera or even just guiding them with their smartphone can be enough to spark their creative interest. The goal is to connect them to the place through the active process of observation and creation, making the history a backdrop for their own artistic adventure.
Tokyo Tech Adventures: How to Navigate Akihabara’s Retro Scene Without Knowing Japanese?
Stepping into a visually dense and linguistically foreign environment like Tokyo’s Akihabara can be overwhelming. The flashing neon signs, the cacophony of sounds from arcades, and the walls of text you can’t read can create a barrier. For a photographer, however, this is an opportunity. When you can’t rely on written language, you are forced to communicate and navigate using the most powerful universal language there is: the visual image.
Your camera becomes your guide and your translator. Instead of trying to read the signs on a retro video game shop, you can focus on capturing the graphic design, the pixelated characters, and the nostalgic colors. This is a practice in pure visual storytelling. Your goal is to capture the *feeling* and *essence* of the place, not to provide a literal translation. Focus on key visual themes:
- Light and Color: Akihabara is a symphony of artificial light. Practice capturing the neon glow, the reflections on wet pavement, and the way light spills out from storefronts. Use a wide aperture (like f/1.8) to isolate subjects against a background of blurred, colorful lights (bokeh).
- Human Element: While respecting privacy and local customs (always be discreet and ask for permission for close-ups), observe how people interact with the environment. A shot of hands on an arcade stick, a silhouette against a glowing vending machine, or the focused expression of a collector tells a powerful story.
- Abstract Details: Get close. Photograph the intricate wiring behind a stack of old consoles, the texture of a worn-out arcade button, or the repeating patterns of merchandise. These abstract shots build a sensory map of the location that words cannot describe.
In a place like Akihabara, you don’t need to know Japanese to understand the passion for gaming or the energy of the retro scene. You can read it in the visual cues, the character designs, and the expressions of the people. By focusing your lens on these elements, you’re not just navigating the district; you’re documenting its soul, creating a travelogue that is understood by everyone, regardless of the language they speak.
Key takeaways
- Mastery over avoidance: Shift your mindset from passively avoiding crowds to actively controlling your frame with technical skills.
- The right tool for the job: Understand that wide-angle lenses immerse your subject in its context, while telephoto lenses surgically isolate it. Choose your strategy first, then your lens.
- Realism vs. Fabrication: When removing people, Median Stacking offers the most realistic and professional result, while Generative Fill trades authenticity for speed. Choose based on your ethical and quality standards.
Visiting Cultural Heritage Centers: How to Make History Interesting for Teenagers?
Beyond simply engaging a teenager with a camera, you can elevate the experience by turning a visit to a heritage site into a collaborative photo project. This moves beyond a simple treasure hunt and into the realm of co-creation, teaching valuable skills and producing a tangible, shared outcome. The focus shifts from individual entertainment to a joint creative endeavor.
The first step is to define the project. It could be a small photo book documenting the visit, a curated Instagram post, or a short video slideshow. Having a clear final product in mind gives the activity purpose. From there, you can establish roles. Perhaps you handle the main camera, while the teenager is the « Art Director, » responsible for finding interesting compositions and details. Or, you can share the shooting, with one person focusing on wide, architectural shots and the other on human details and textures.
This is a perfect opportunity for hands-on teaching. Let them handle your gear (under supervision). Explain the « why » behind your settings in simple terms: « I’m using a fast shutter speed to freeze the movement of that flag, » or « I’m lowering my aperture to blur the background and make this statue stand out. » The most critical part of the collaboration happens after the visit: the editing process. Sit down together and review the photos. This is where the story takes shape. Ask for their input on which images are the strongest and why. Teach them basic editing in an app like Lightroom Mobile—adjusting exposure, cropping for impact, converting to black and white for dramatic effect. By involving them in the final steps, you give them ownership over the creative output.
This collaborative process achieves multiple goals. It demystifies photography, making it an accessible and creative tool. It fosters a deeper appreciation for the heritage site by forcing close, sustained observation. Most importantly, it transforms a potentially boring family outing into a shared memory, cemented in a final project that you both created together, turning a piece of history into a part of your own personal story.
Now that you are equipped with the technical strategies and creative mindset to conquer any crowded location, the next logical step is to put them into practice. Begin by planning your next visit to a local landmark not as a tourist, but as a photographer with a clear mission.